Hello everyone! Welcome to this weekend's update! I've got a small treat for you guys this weekend! I actually painted something! Ha! I took one of the Red Baron scribbles from last week's update and rendered him up a bit. It's pretty loose and sketchy... but still! Color!
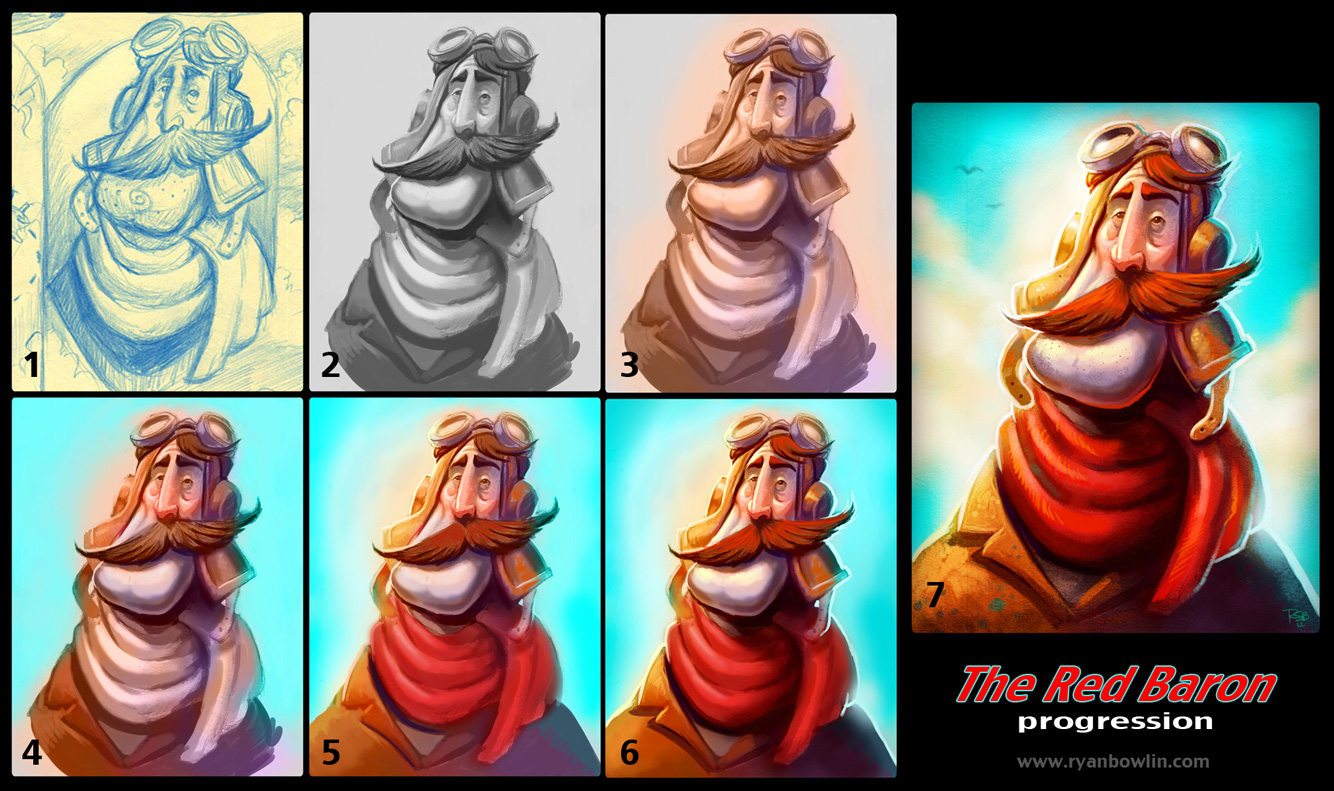
Every so often I get asked about my process and how I go about handling the digital painting medium. The truth is that I don't really follow a rigid process of steps to get things from one end to the other. It's more like building something up from nothing and letting the piece evolve as I make design decisions regarding shapes, colors, etc. As corny as it sounds the piece will speak to you and tell you what it needs as your knowledge of anatomy, color theory and design grows. But for now I'll try and strip it down a bit to help you digest how I roll through a simple painting. You can follow along using the image above.
One
I pretty much always start with a sketch that I've scanned in from a sketchbook or something. I don't own a Cintiq and my skills drawing with a tablet just aren't there. It still feels more natural and I get the best results when I sketch with good ol' pencil and paper. There's just an energy there that I can't seem to get when I switch to digital.
This step is pretty simple since I've done most of the work previously. But I'll discuss a bit of my head space when I'm sketching. When I'm drawing for myself and just havin' a great time I tend to focus on design more the anatomy or anything. I like to just look for shapes and then add more and more shapes until I have something that looks appealing or has some character. It's one part of the process I've fallen in love with. I often draw a random shape and then try to make some sort of interesting character out of it. I wouldn't often draw a rectangle for a head but sometimes I try to just to get myself thinking out of the box (no pun intended). Some of my best, and wackiest, designs have come from simply exploring shapes and form. It's really freeing to draw this way, I find.
It's not without it's drawbacks. Sometimes I do have to tighten up with my more realistic work and stuff I do for the day job. But I'm trying to really bring this philosophy into other areas of my art as well. It just seems to make things more appealing to me. And it's way more fun then constantly fussing over details too early. I can really kill my drawings that way and I do. I just keep reminding myself, "General to specific."
Two
In this phase I'm doing a bit of clean up and simplification at the start. The sketch was messy so I've zapped the color out of it and removed all the scratchy lines that distract me from the character. As I'm doing this I'm pretty much just painting the character in greyscale. I'm careful to try and keep my values closer to the midrange so that when I apply color later I can really get the original render to soak up the saturated tones. Avoid using white or black as much as possible. Even though some of the tones may look white or black they're not. Color pick them and you'll see that I try to stay just out of that range.
I reserve those values for the end when I need one last good punch to pop something out or draw the eye. Often I see images from artists that are way to dark or filled with white. When you're painting try to remind yourself to "paint with color." Instead of using white for that bright light source maybe some orange with a touch of yellow? Then when you use the white later it'll really sing. But I'm getting ahead of myself. ;o)
While in my greyscale rendering stage I'm still pretty loose. Whatever I paint here isn't going to be final or anything. I'll be painting over it. It's merely and opportunity to set up my lighting and structure of the character. I try to pay attention to where the light is coming from and how it hits/affects the surface of the character. For example I'll make sure to note that cast shadow coming off below his mega chin since the light is catching so much of it. Try to think of your character as a 3D model with a lamp over it. Think of how the light would catch certain planes of the surface and how it wouldn't be able to get into other areas as much like up near the top of the eye socket or the shadow created when the light hits the top of the nose.

When all else fails move back to the rendering/lighting basics. You remember that ball with the one light source that your art teacher would have you draw in charcoal back in art school? That little exercise holds most of the answers for you. If you want something to pop forward make sure you have all of those lighting elements (highlight, midtones, core shadow, reflected light and cast shadow). It really helps to give your form dimension. I can't really do this justice here since we need to move on but there tons of tutorials online tackling this very subject. Give it a google!
Three
I tend to get to this stage pretty quickly so I don't spend a ton of time building this beautiful greyscale render and then tearing it all down again by painting over it later with color. I used to do that before I'd hate myself often. Ha! Basically I just dowse my greyscale render with a few colors to remind myself that I'm doing a color piece and not to get so caught up in the initial render. I knew that I wanted the light source to be warm so I took a color layer (you can change the style of your layer to get other effects) and painted in some orange-yellow color where the light would hit the character (determined partially from the information I created in my greyscale painting).
Then I put my color theory skills to work! I once heard it said that the light and shadow colors should be compliments to each other. If you're going to have a warm light source then your shadows should be cool to make the piece more vibrant. They're compliments not only in temperature but color as well. Since I used a orange-yellow for the light I knew I'd want some cooler purple-blues in the shadows. So I quickly roughed that in as well. Just like the greyscale render in step two, I'm just getting my head in the right space for the next phase. I know these colors won't be final but they help get me thinking in the right direction. Sometimes I even play with the color slider to see if other combos look more interesting. But for this one I pretty much stayed true to my original notes.
Four
Once you have a decent underpainting rockin' it's time to start adding in more touches of color to help inform decisions to come. From here on out it's kind of a gradual back and forth of trying some color out to see what works and building up a render on the character. You can see I've started to flesh out his face a bit more as well as adding a touch of red in the places where the blood collects (cheeks, nose, ears) and cooling his chin to indicate some stubble. I apply my color early on via three ways.
A: Color Layer - This helps me get something in initially although it often doesn't look amazing. It should help me start seeing the potential color relationships going on in the rest of the piece.
B: Overlay Layer/Color Dodge Layer - I play around with both of these at varying opacities as well. Sometimes I'll duplicate my color layer and turn it into an overlay layer just to see if it gets me more vibrant colors.
But it's important to note that going the A and B route are really only a means to service the best route for applying color, route C. Yes, I'm building a base with my nifty special layers but they often looks dead and lifeless. I use them more as a means of "mixing color" and finding things I like that I hadn't thought of in terms of how the colors shift and relate to the stuff I already have painted in. But route C is the best way to apply color and is what makes all the difference in a finished looking piece.
Five and Six
C: Opaque Painting - Good ol' paintbrush to canvas painting. This is where you make your informed decisions regarding color placement and rendering. All that experimenting with the layers and stuff not only provided you with a great underpainting, it also helps you make better choices moving into this phase.
I spend most of my time rendering and painting this way. I make an effort to continue to "blast out the white" from my image as I render it and brush paint in. Remember what I said earlier about trying to paint with color and not with black or white. Usually the colors I paint with here are more saturated and because I've been experimenting I'm much more confident in what I want when I'm laying them in. For example you'll see in image 4 that the bulk of his helmet on the shadow side is pretty cool and dull. I touched it up a bit in 5 and 6 in order to really pop out where I thought the light might hit it the most while still retaining some of the cool underpainting below. The image was also feeling too cool overall and I felt the addition of the red scarf would kick the warmth of the image up a few notches. It did and you'll see I've started experimenting with adding a bit of red's compliment into the image as well, green. In hindsight I kind if wish I would of found more ways to work green in.
One other thing to note when you're brushing in opaque color is that you'll see nice, tasty brush strokes in there. You're making marks now so you'll want to make sure they're confident and bold looking. And you really want to make sure you follow the surface of the form, almost like you're touching the surface plane with the brush. I try to think, again, of the image like a 3D model. Your brush strokes should sort of follow the plane like the wireframe of a model, if that makes sense. These sorts of things will help give your image further dimension. The more of this stuff you have in each object the more it pushes forward towards the viewer. The less planes you paint into an object the more it recedes into the painting. The sky is pretty flat and the head is the most rendered out which makes it pop forward the most.
Seven
As you render the piece up you just need to continue keeping in mind the stuff that got you to this step (lighting, structure, color choices, etc.). Just keep reinforcing those things you discovered early on and make efforts to enhance and strengthen them.
Using color and value you can push and pull elements of the painting to make it appear closer to the viewer or further away. You can also use these same elements to draw the viewer's eye to certain places. Pick a focal point and guide the viewer to it. For a portrait it's usually the face and I try to make an effort to really get some personality in the eyes. Keep the structure in mind too and keep thinking about how the light is effecting the surface and creating shadows. Sometimes near the end I'll think a bit more about the reflected light and rim the character with it to really push him off the surface of the canvas.
And once my render is nearly complete I'll top it off by softening some of the edges to further enforce depth of field or lighting, maybe drop another overlay layer over places to bring even more warmth back into the strongly lit areas, adjust the brightness/contrast levels to make sure the image is contrasty enough and add in whatever texture or effects I want. For this guy I simply added a subtle paper texture to the image from something I found on Google. Then I framed and vignetted the image slightly to push back that bright blue sky. I also was able to sneak a bit of that green I mentioned earlier in this way!
That just about does it! At this point it's really all about finessing and fretting over the details. Most of the hard work has been done and all you're really doing is polishing the image where needed. It's good to leave some of the less important parts of the painting loose and rough looking so that your eye will travel to the more interesting areas. I tend to really sharpen some of my edges where I'm really drawing the focus of the viewer as well.
And that's that! A Red Baron lives! Ha! That was a ton of rambling but I hope there was something worth while in there! Let me know if you found this helpful or have any questions.
I'm pretty sure I've met my word quota for the week. Be on the look out for more scribbles! Until next time I'll see ya on Facebook and Twitter! Peace out, minions! Don't forget to be awesome!
- Ryan